• Info@BridgeUpholsteryAndDrapery.com
  • |
  • 417.429.1243

Custom Draperies Curtains Shades Window Treatments and Furniture Upholstery and Reupholstery in Springfield, MO

  • Home
  • Services
    • Custom Draperies
    • Custom Upholstery
    • Custom Shades & Blinds
    • Areas We Serve
  • View Our Work
    • Sofas
    • Chairs
    • Ottomans & Benches
    • Pillows, Window Seats & Outdoor Cushions
    • Draperies
    • Shades & Blinds
    • Client Testimonials
    • Items for Sale
  • About Us
  • Bridge Blog
  • Contact Us

Adding Trim to Your Upholstery and Drapery Projects

March 29, 2016 by Bridge Upholstery & Drapery

1-custom-pillow-completeAt Bridge, we’ve been adding tape trim to many projects.  Greek key tape trim and twill tape have been very popular.  We love the style these tapes add to our pillows and window treatments, so we thought we’d share a few of the projects with you.

Pillows with Greek Key Trim

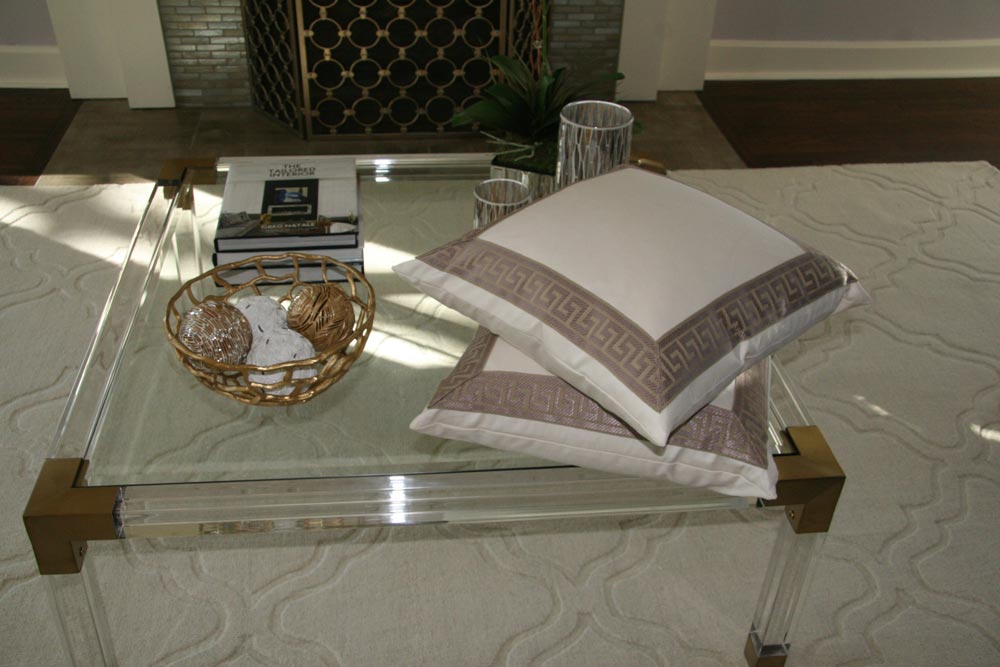
Even a plain twill pillow is so much more interesting with Greek key trim. These 18″ pillows were embellished with khaki and lavender Greek key trim.

custom-greek-key-trim-tape-pillows-roman-shades 051 (1)These pillows, made with Schumacher’s Bargello fabric, looked great with the addition of this khaki and cream Greek key trim.

custom-greek-key-trim-tape-pillows-roman-shades 052 (1)

Greek Key Design Using Twill Tape

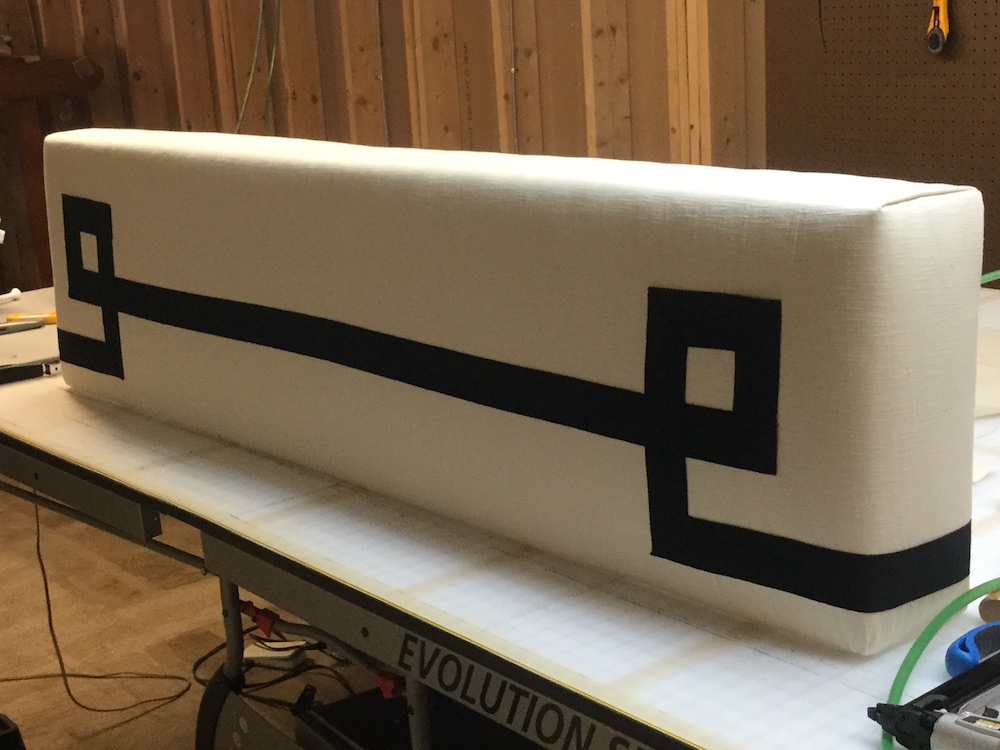
In addition to using a Greek Key trim, you can create a Greek Key motif using twill tape.  We used 2″ wide twill tape to embellish cream drapes and a coordinating upholstered cornice.  Here’s a photo of the cornice before installation.

custom-greek-key-trim-tape-cornice 053
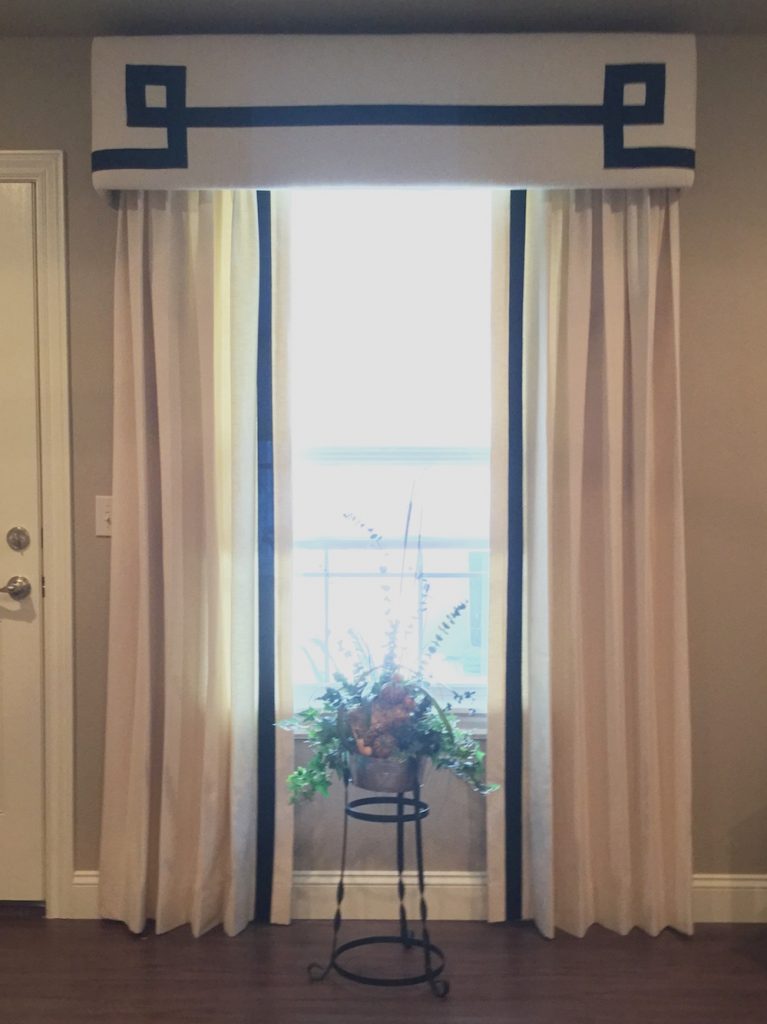
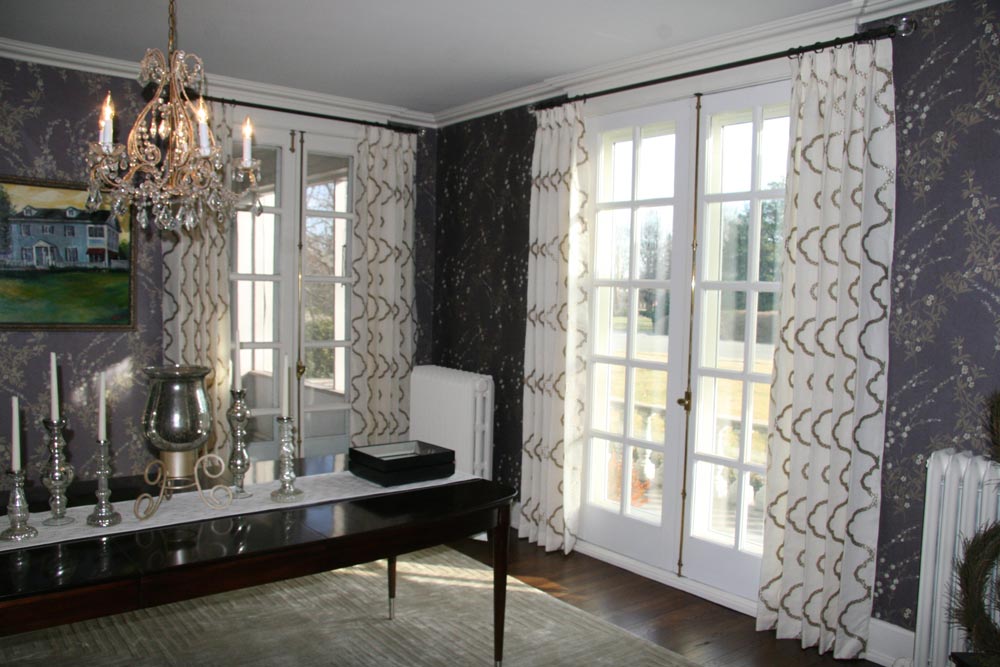
Here’s a bright and sunny photo of the installed drapes and upholstered cornice.  The drapes were trimmed with a single stripe of twill tape 2″ from the inside edge.  This window treatment added so much interest to this living room.

custom-greek-key-trim-tape-cornice-drapes 054

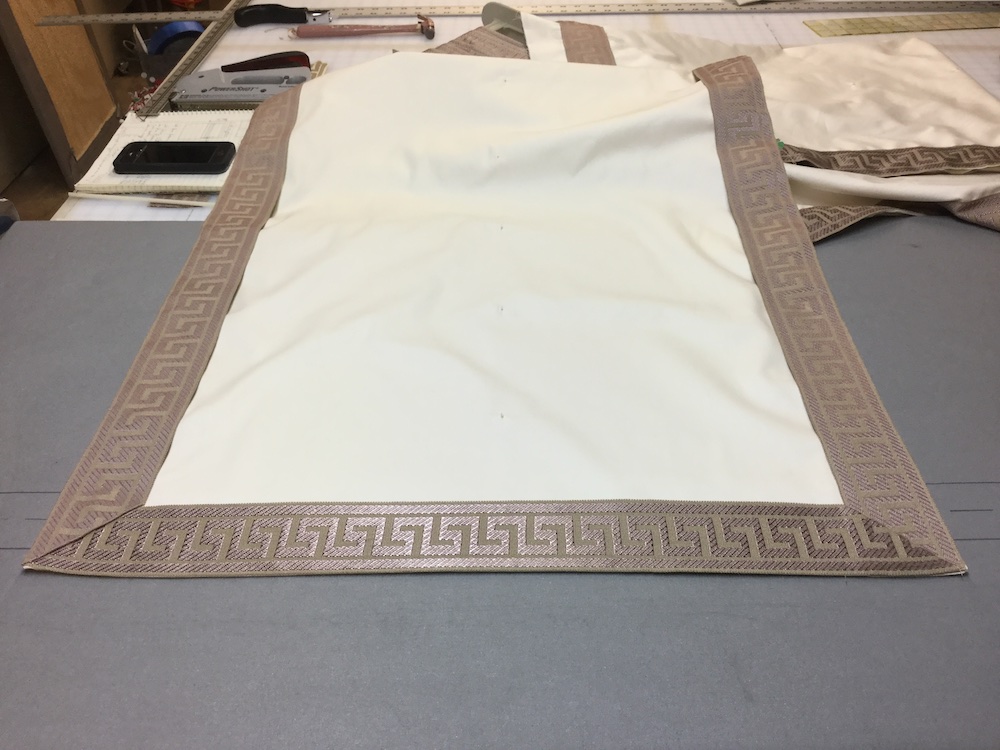
Roman Shades with Greek Key Trim

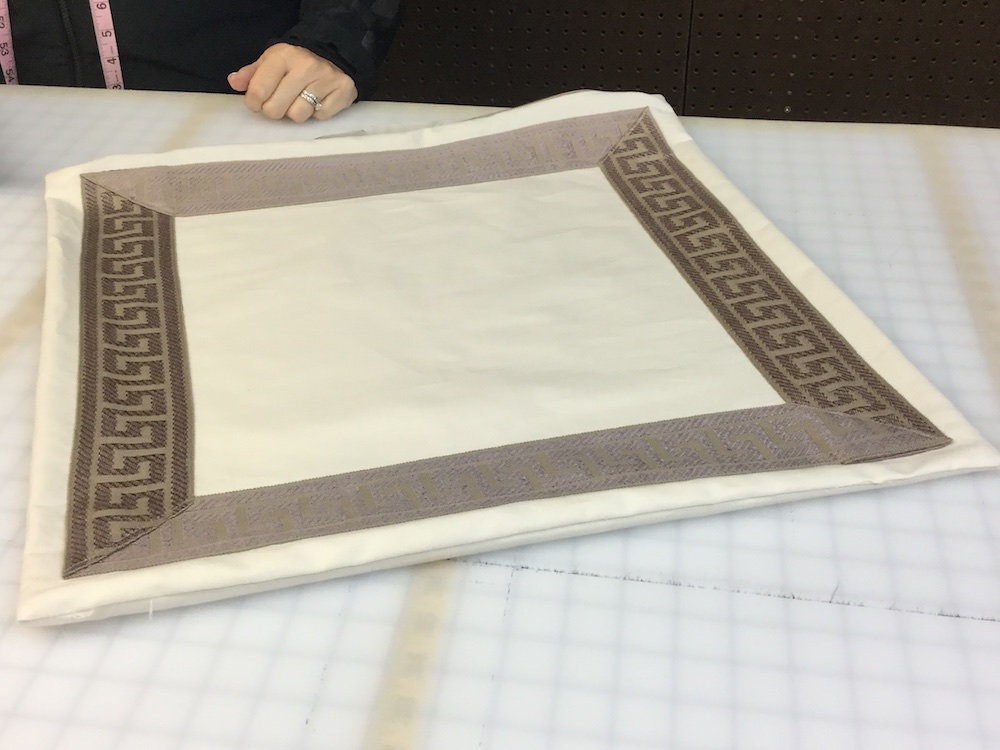
Roman Shades can also be embellished with tape trim.  We made some fun Greek Key Trimmed Roman Shades for the living room of a Springfield home.  You may have seen our article about the Dining Room Drapes in the same home.  Our client chose the lavender and khaki Greek Key trim and we added it to her cream cotton twill Roman Shades.  Here’s a great photo of the Roman Shade during construction.

custom-greek-key-trim-tape-pillows-roman-shades 068
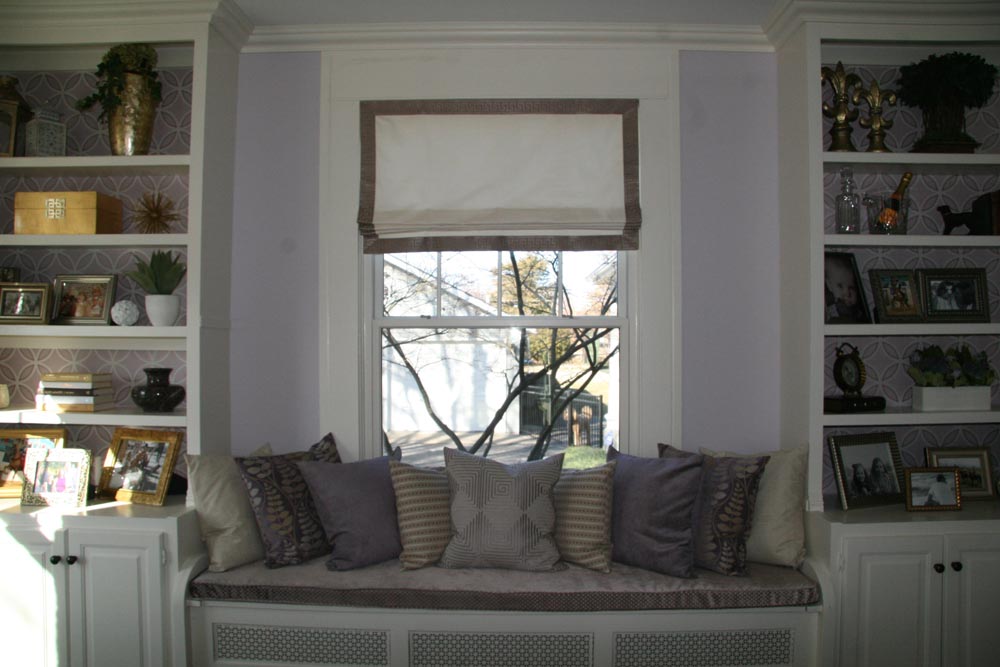
Here’s a photo of one of the installed Roman Shades.  We also enjoyed making a variety of patterned pillows and a window box cushion to coordinate with the Roman Shade.

1-custom-roman-shade-window-seat-cushion-pillows-frontThese are just a few of the great uses for tape trim on pillows, Roman Shades, cornices and drapes.  We hope we’ve inspired your creativity and helped you think of some trimmed projects for your home.

Contact Us at Bridge.  We’d love to help you with your future upholstery and drapery projects.

Filed Under: Articles & Resources Tagged With: Adding Trim to Pillows, Adding Trim to Roman Shades, custom curtains, Custom Draperies, custom drapes, custom pillows, custom roman shade, custom shades, custom window shade, Design Considerations, Greek Key, Greek Key Design with Twill Tape, Greek Key Tape, Greek Key Trim, Twill Tape, upholstered cornice, Using Twill Tape to make a Greek Key Pattern

How to Design Drapes using Patterned Fabric | Historic Springfield Home

March 13, 2016 by Bridge Upholstery & Drapery

Historic-Springfield-Home-Before-Dining-Room-Drapery-Installation 010

We recently participated in the redecorating project of a client’s formal dining and living rooms.  We made beautiful new linen drapes for three french doors in her dining room and Greek Key trimmed Roman Shades for windows and french doors in her living room.  I’ll explain a few of the basic design considerations for the dining room in this post.  Stay tuned for details about the Living Room Roman Shades.

1-custom-curtain-drapes-installed

Initial Design and Planning for Vertical Repeat

The client chose to use Thibault’s Gibraltar Embroidery Fabric.  We rolled out the fabric and began to study the pattern and make some design decisions.  The client chose to use her existing drapery hardware, so the drapery height was set at 100.5″.  The fabric has a vertical repeat of 15.5.  We know that we want each drapery panel to look the same at the top and bottom, so we will cut multiples of the fabric repeat.  For a finished drape of 100.5″, we will need to cut each panel face fabric to 114.5″.  This includes 6″ for the top hem and 8″ for the bottom hem plus 100.5″ for the drapery front.  The top hem will be a 3″ double fold hem and the bottom hem will be a 4″ double fold hem.  To make sure that the draperies always begin at the same place vertically, we need to cut multiples of 15.5 that are greater than 114.5″.  We needed to cut panels every 124″ vertically and then remove the excess 9.5″ before hemming the top and bottom.

Thibault-Gibraltar-Embroidery-Fabric-Horizontal-repeat 005

To determine the proper place to cut, we looked at the fabric and decided which part of the pattern would look best at the pleats in the top of the drapery.  We made some mock pleats and decided to cut 6″ above the fold at the top of the pleats shown below.  At this time, we also determined that we’d like to have this pattern on the front of each pleat.  To align the pleats, we’d need to match our pleats and pleat spaces to the horizontal repeat of the fabric.

Pleated-drapery-panels 005

Planning for and finding Horizontal Repeat

To find the horizontal repeat of the fabric, measure from the same spot on the fabric pattern to the same exact adjacent spot on the fabric pattern.  In this case, the horizontal repeat of the fabric is 10.5″.

Thibault-Gibraltar-Embroidery-Fabric-Horizontal-repeat 006

We constructed the drapery panel pleats to match the horizontal repeat of the fabric. As shown below, each pleat corresponds to the same section of the fabric pattern.  We accomplished this by making the pleat space (the flat horizontal area between the pleats) and the pleats (the fabric folded up into the pleat) add up to the horizontal repeat.  For example, if the horizontal repeat is 10.5″, and we know that 6″ is a good amount of fabric for pleats, then the pleat space needs to be 4.5″ to make the pleats align with the fabric pattern.  This gave us a finished drapery width of 23″.  This includes 2×2.5″ on each side and 4×4.5″ in pleat spaces.  In this case, the client did not plan to close the draperies.  Since they are stationary, the finished width did not need to be 1/2 the window width plus overlaps and returns on the sides.  23.5″ is a good width for decorative stationary drapery panels on these french doors.

1-custom-curtain-drape-cinched

Choosing Drapery Pleat Styles

After making five 6″ pleats, we chose 5 drapery panel pleat styles and sent them to our client for approval.  The pleats are shown below and are from left to right:  a cartridge pleat, a butterfly pleat, a triple euro pleat, a double pinch pleat and finally a triple pinch pleat.

1-custom-curtain-drape-top

Our client liked both the butterfly pleat and the triple pinch pleat.  We especially liked how the fabric pattern looked on the butterfly pleat, but after consideration of the client’s overall style, we chose the more traditional triple pinch pleat.  We believe she’ll be happy with the triple pinch pleat for years to come.

Pressing and Training Finished Drapes

One additional very important step when dealing with linen draperies is pressing and training the drapes.  As you can see below, we pressed the drapes and then loosely folded them and tied them for transport.  The process of folding drapes and tying them so that they hang with folds at each pleat is called training.  Linen drapes like these train (and wrinkle and crease) very easily, so we didn’t have to keep them tied up once they were installed.  If you are constructing drapes with heavy velvet or damask fabric, you may need to leave them hanging with their ties on for a few days to get them to hang with a fold at each pleat.

Pleated-drapery-panels-trained 008

Here they are trained and tied up to be delivered to our client’s home.

Pleated-drapery-panels-trained 009

Look at the difference ironing and training can make!  The drapes on the left are ready to go, the pile of draperies on the right haven’t been pressed yet.  My mom always says that half of sewing is ironing – you can really see it here.

Pleated-drapery-panels-trained 007

Installed Drapes

Here is a photo of the finished and installed dining room drapes.  As you can see, they have been trained to hang perfectly with folds at each pleat.

Dining-Room-drapes-pleated-linen-installed 011

We hope you have enjoyed reading about how to design draperies with patterned fabric!  We’d love to help you with your next drapery design project.  Please contact us for all your upholstery and drapery needs.

Filed Under: Uncategorized Tagged With: Custom Draperies, custom drapes, Design Considerations, Draperies, Drapery Design, Drapes, Gibraltar, Horizontal Repeat, How-to Design Drapes, Patterned Fabric, Pressing Drapes, Thibault, Thibault Gibraltar, Thibault Gibraltar Embroidery Fabric, Training Drapes, Vertical Repeat

How to Design Drapes using Patterned Fabric | Historic Springfield Home

March 11, 2016 by Bridge Upholstery & Drapery

Historic-Springfield-Home-Before-Dining-Room-Drapery-Installation 010

We recently participated in the redecorating project of a client’s formal dining and living rooms.  We made beautiful new linen drapes for three french doors in her dining room and Greek Key trimmed Roman Shades for windows and french doors in her living room.  I’ll explain a few of the basic design considerations for the dining room in this post.  Stay tuned for details about the Living Room Roman Shades.

1-custom-curtain-drapes-installed

Initial Design and Planning for Vertical Repeat

The client chose to use Thibault’s Gibraltar Embroidery Fabric.  We rolled out the fabric and began to study the pattern and make some design decisions.  The client chose to use her existing drapery hardware, so the drapery height was set at 100.5″.  The fabric has a vertical repeat of 15.5.  We know that we want each drapery panel to look the same at the top and bottom, so we will cut multiples of the fabric repeat.  For a finished drape of 100.5″, we will need to cut each panel face fabric to 114.5″.  This includes 6″ for the top hem and 8″ for the bottom hem plus 100.5″ for the drapery front.  The top hem will be a 3″ double fold hem and the bottom hem will be a 4″ double fold hem.  To make sure that the draperies always begin at the same place vertically, we need to cut multiples of 15.5 that are greater than 114.5″.  We needed to cut panels every 124″ vertically and then remove the excess 9.5″ before hemming the top and bottom.

Thibault-Gibraltar-Embroidery-Fabric-Horizontal-repeat 005

To determine the proper place to cut, we looked at the fabric and decided which part of the pattern would look best at the pleats in the top of the drapery.  We made some mock pleats and decided to cut 6″ above the fold at the top of the pleats shown below.  At this time, we also determined that we’d like to have this pattern on the front of each pleat.  To align the pleats, we’d need to match our pleats and pleat spaces to the horizontal repeat of the fabric.

Pleated-drapery-panels 005

Planning for and finding Horizontal Repeat

To find the horizontal repeat of the fabric, measure from the same spot on the fabric pattern to the same exact adjacent spot on the fabric pattern.  In this case, the horizontal repeat of the fabric is 10.5″.

Thibault-Gibraltar-Embroidery-Fabric-Horizontal-repeat 006

We constructed the drapery panel pleats to match the horizontal repeat of the fabric. As shown below, each pleat corresponds to the same section of the fabric pattern.  We accomplished this by making the pleat space (the flat horizontal area between the pleats) and the pleats (the fabric folded up into the pleat) add up to the horizontal repeat.  For example, if the horizontal repeat is 10.5″, and we know that 6″ is a good amount of fabric for pleats, then the pleat space needs to be 4.5″ to make the pleats align with the fabric pattern.  This gave us a finished drapery width of 23″.  This includes 2×2.5″ on each side and 4×4.5″ in pleat spaces.  In this case, the client did not plan to close the draperies.  Since they are stationary, the finished width did not need to be 1/2 the window width plus overlaps and returns on the sides.  23.5″ is a good width for decorative stationary drapery panels on these french doors.

1-custom-curtain-drape-cinched

Choosing Drapery Pleat Styles

After making five 6″ pleats, we chose 5 drapery panel pleat styles and sent them to our client for approval.  The pleats are shown below and are from left to right:  a cartridge pleat, a butterfly pleat, a triple euro pleat, a double pinch pleat and finally a triple pinch pleat.

1-custom-curtain-drape-top

Our client liked both the butterfly pleat and the triple pinch pleat.  We especially liked how the fabric pattern looked on the butterfly pleat, but after consideration of the client’s overall style, we chose the more traditional triple pinch pleat.  We believe she’ll be happy with the triple pinch pleat for years to come.

Pressing and Training Finished Drapes

One additional very important step when dealing with linen draperies is pressing and training the drapes.  As you can see below, we pressed the drapes and then loosely folded them and tied them for transport.  The process of folding drapes and tying them so that they hang with folds at each pleat is called training.  Linen drapes like these train (and wrinkle and crease) very easily, so we didn’t have to keep them tied up once they were installed.  If you are constructing drapes with heavy velvet or damask fabric, you may need to leave them hanging with their ties on for a few days to get them to hang with a fold at each pleat.

Pleated-drapery-panels-trained 008

Here they are trained and tied up to be delivered to our client’s home.

Pleated-drapery-panels-trained 009

Look at the difference ironing and training can make!  The drapes on the left are ready to go, the pile of draperies on the right haven’t been pressed yet.  My mom always says that half of sewing is ironing – you can really see it here.

Pleated-drapery-panels-trained 007

Installed Drapes

Here is a photo of the finished and installed dining room drapes.  As you can see, they have been trained to hang perfectly with folds at each pleat.

Dining-Room-drapes-pleated-linen-installed 011

We hope you have enjoyed reading about how to design draperies with patterned fabric!  We’d love to help you with your next drapery design project.  Please contact us for all your upholstery and drapery needs.

Filed Under: Articles & Resources Tagged With: custom curtains, custom drapes, Design Considerations, Draperies, Drapery Design, Drapes, Gibraltar, Horizontal Repeat, How-to Design Drapes, Patterned Fabric, Pressing Drapes, Thibault Gibraltar Embroidery Fabric, Training Drapes, Vertical Repeat

How to Design Drapes using Patterned Fabric | Historic Springfield Home

March 4, 2016 by Bridge Upholstery & Drapery

Historic-Springfield-Home-Before-Dining-Room-Drapery-Installation 010

We recently participated in the redecorating project of a client’s formal dining and living rooms.  We made beautiful new linen drapes for three french doors in her dining room and Greek Key trimmed Roman Shades for windows and french doors in her living room.  I’ll explain a few of the basic design considerations for the dining room in this post.  Stay tuned for details about the Living Room Roman Shades.

1-custom-curtain-drapes-installed

Initial Design and Planning for Vertical Repeat

The client chose to use Thibault’s Gibraltar Embroidery Fabric.  We rolled out the fabric and began to study the pattern and make some design decisions.  The client chose to use her existing drapery hardware, so the drapery height was set at 100.5″.  The fabric has a vertical repeat of 15.5.  We know that we want each drapery panel to look the same at the top and bottom, so we will cut multiples of the fabric repeat.  For a finished drape of 100.5″, we will need to cut each panel face fabric to 114.5″.  This includes 6″ for the top hem and 8″ for the bottom hem plus 100.5″ for the drapery front.  The top hem will be a 3″ double fold hem and the bottom hem will be a 4″ double fold hem.  To make sure that the draperies always begin at the same place vertically, we need to cut multiples of 15.5 that are greater than 114.5″.  We needed to cut panels every 124″ vertically and then remove the excess 9.5″ before hemming the top and bottom.

Thibault-Gibraltar-Embroidery-Fabric-Horizontal-repeat 005

To determine the proper place to cut, we looked at the fabric and decided which part of the pattern would look best at the pleats in the top of the drapery.  We made some mock pleats and decided to cut 6″ above the fold at the top of the pleats shown below.  At this time, we also determined that we’d like to have this pattern on the front of each pleat.  To align the pleats, we’d need to match our pleats and pleat spaces to the horizontal repeat of the fabric.

Pleated-drapery-panels 005

Planning for and finding Horizontal Repeat

To find the horizontal repeat of the fabric, measure from the same spot on the fabric pattern to the same exact adjacent spot on the fabric pattern.  In this case, the horizontal repeat of the fabric is 10.5″.

Thibault-Gibraltar-Embroidery-Fabric-Horizontal-repeat 006

We constructed the drapery panel pleats to match the horizontal repeat of the fabric. As shown below, each pleat corresponds to the same section of the fabric pattern.  We accomplished this by making the pleat space (the flat horizontal area between the pleats) and the pleats (the fabric folded up into the pleat) add up to the horizontal repeat.  For example, if the horizontal repeat is 10.5″, and we know that 6″ is a good amount of fabric for pleats, then the pleat space needs to be 4.5″ to make the pleats align with the fabric pattern.  This gave us a finished drapery width of 23″.  This includes 2×2.5″ on each side and 4×4.5″ in pleat spaces.  In this case, the client did not plan to close the draperies.  Since they are stationary, the finished width did not need to be 1/2 the window width plus overlaps and returns on the sides.  23.5″ is a good width for decorative stationary drapery panels on these french doors.

1-custom-curtain-drape-cinched

Choosing Drapery Pleat Styles

After making five 6″ pleats, we chose 5 drapery panel pleat styles and sent them to our client for approval.  The pleats are shown below and are from left to right:  a cartridge pleat, a butterfly pleat, a triple euro pleat, a double pinch pleat and finally a triple pinch pleat.

1-custom-curtain-drape-top

Our client liked both the butterfly pleat and the triple pinch pleat.  We especially liked how the fabric pattern looked on the butterfly pleat, but after consideration of the client’s overall style, we chose the more traditional triple pinch pleat.  We believe she’ll be happy with the triple pinch pleat for years to come.

Pressing and Training Finished Drapes

One additional very important step when dealing with linen draperies is pressing and training the drapes.  As you can see below, we pressed the drapes and then loosely folded them and tied them for transport.  The process of folding drapes and tying them so that they hang with folds at each pleat is called training.  Linen drapes like these train (and wrinkle and crease) very easily, so we didn’t have to keep them tied up once they were installed.  If you are constructing drapes with heavy velvet or damask fabric, you may need to leave them hanging with their ties on for a few days to get them to hang with a fold at each pleat.

Pleated-drapery-panels-trained 008

Here they are trained and tied up to be delivered to our client’s home.

Pleated-drapery-panels-trained 009

Look at the difference ironing and training can make!  The drapes on the left are ready to go, the pile of draperies on the right haven’t been pressed yet.  My mom always says that half of sewing is ironing – you can really see it here.

Pleated-drapery-panels-trained 007

Installed Drapes

Here is a photo of the finished and installed dining room drapes.  As you can see, they have been trained to hang perfectly with folds at each pleat.

Dining-Room-drapes-pleated-linen-installed 011

We hope you have enjoyed reading about how to design draperies with patterned fabric!  We’d love to help you with your next drapery design project.  Please contact us for all your upholstery and drapery needs.

Filed Under: Uncategorized Tagged With: Custom Draperies, custom drapes, Design Considerations, Draperies, Drapery Design, Drapes, Gibraltar, Horizontal Repeat, How-to Design Drapes, Patterned Fabric, Pressing Drapes, Thibault, Thibault Gibraltar, Thibault Gibraltar Embroidery Fabric, Training Drapes, Vertical Repeat

Custom Drapes Curtains and Shades | Springfield, MO

March 3, 2016 by Bridge Upholstery & Drapery

Here is a recent project we completed for a client that consisted of custom Drapes, Roman Shades and even Pillows! Below you can see some of the design and creation process as well as the completed and installed items.  We’ll create a more detailed blog post soon – so stay tuned!

1-custom-curtain-drape-top

1-custom-drape-curtain-measurement

1-custom-curtain-drape-cinched

1-custom-curtain-drape-top

1-custom-pillow-sewing-fabric

1-custom-pillow-complete

1-custom-curtain-drapes-installed


1-custom-roman-shades-window-seat-cushion-pillows-installed

1-custom-window-roman-shade

1-custom-roman-shade-window-seat-cushion-pillows-front


Filed Under: Articles & Resources Tagged With: custom curtains, custom drapes, custom pillows, custom roman shade, custom shades, custom window shade, Thibault, Thibault Fabric, thibault gibraltar embroidery

Recent Articles and Projects

  • Bridge was Featured in 417 Home Magazine!
  • Bridge Welcomes New Employees Adam and Allison!
  • The Big Reveal! Bridge Upholstery and Drapery’s New Storefront!
  • Big News! Bridge Has Moved to 202 E Commercial Street!
  • Reupholstery of Living Room Furniture | Custom Home on Table Rock Lake
  • The Quest for an Industrial Sewing Machine
  • Custom Upholstery of Unique Velvet Chair and Creation of Matching Ottoman
  • How to Miter Corners When Sewing with Tape Trim
  • Adding Trim to Your Upholstery and Drapery Projects
  • Custom Upholstery of Vintage La-Z-Boy Recliners | Springfield, MO
  • How to Design Drapes using Patterned Fabric | Historic Springfield Home
  • Custom Swivel Chairs and Sectional Couch Repholstery | Springfield, MO
  • Custom Drapes Curtains and Shades | Springfield, MO

      Contact Bridge Now

      * indicates required field

      Acceptable file types: doc,docx,pdf,txt,gif,jpg,jpeg,png.
      Maximum file size: 5mb.
      CAPTCHA
      Refresh

      Connect with Bridge

      Bridge Upholstery and Drapery
      202 E Commercial St
      Springfield, MO 65803

      417.429.1243
      Info@BridgeUpholsteryAndDrapery.com
      BridgeUpholsteryandDrapery.com

      Like and Follow Bridge on Social Media!
      Facebook
      Facebook
      fb-share-icon
      Pinterest
      Pinterest
      Pin Share
      Houzz
      Houzz
      Twitter
      Visit Us
      Follow Me
      Tweet

      Our Services

      • Custom Drapes
      • Custom Curtains
      • Custom Shades
      • Custom Window Treatments

      • Custom Upholstery
      • Custom Reupholstery
      • Furniture Upholstery
      • Furniture Reupholstery
      • Furniture Renewal
      • Furniture Restoration

      Areas We Serve

      Bridge Upholstery and Drapery is proud to provide custom draperies, curtains, shades and window treatments as well as furniture upholstery, reupholstery, renewal and restoration services to the greater Springfield and Southwest Missouri area.

      Serving Springfield | Republic | Willard | Fordland | Rogersville | Branson | Kimberling City | Nixa | Ozark | Clever | Sparta | Spokane | Battlefield | Marshfield | Strafford | Bolivar | Highlandville | Lebanon | Fair Grove | Buffalo | Greenfield

      Copyright © 2021 — Bridge Upholstery & Drapery


      Custom Draperies Curtains Shades and Window Treatments | Custom Furniture Upholstery and Reupholstery


      Serving the Greater Springfield and Southwest Missouri Area


      All rights reserved.